Hi friends, this blog will be little bit lengthy. Application security is a Chapter in Senior System Architect Pega Course. Below are the concepts I learnt in this chapter.
If we want to login into Pega application
we need some credentials that credentials is named as Operator Id in
Pega
Operator ID Rule:
Below screenshot displays SSA@TGB Operator
ID Rule. In security Tab we can set Password for the Operator ID.
There are different portals available
in Pega.
1.
Administrator - Developer will
use this portal to develop or modify pega application.
2.
Manager - Manager will access
this portal to look at the process of works by users using report. He can also
process Case allocated to him.
3.
User - End User who will work
on pega application.
When we create a Pega Application by
default, Access group will automatically created by Pega.
What is Access Group?
Access Group is a rule where we define
below major functionality
1, Which Portal should open when Operator
Login.
2, List of Roles Operator has Access to.
3, Work Pool(Work Basket to which Operator
ID is assigned to work).
Portal Mapping in Access Group:
Role Mapping in Access Group:
In the Above image we can see Many roles
Administrator has access to and the meaning is, Admin can do
administration(Rule Creation, Rule Modification, Rule Deletion, etc), He can
act as Manager, He can act as User too.
Below Image is the Manager Operator ID’s
Access Group.
Manager can act as Manager or he can act as
User. So 2 Roles(Manager,User) added to Manager Access Roles.
Below is the User Operator ID’s Access
Group.
User can act only as User. He can’t act as
a manager or he can’t act as a Admin. So only one role added to User Access
Group.
Work Pool Mapping In Access Group:
Here we will define the class of
Works(Case) operator has access to.
ReserveIT Application’s Access Group has
access to only ReserveIT Work Items. From ReserveIT Application we cant access
HRApps Application.
So we have to Provide ReserveIT Work Class
Group here.
Now we will see briefly about Access
Roles
What is access roles?
Access roles used to categorized user
according to their job functionality. Each access role defines how set of user
interacts with the application to create Case.
For Example, User can create case. But Admin can
only delete a case.
Note:
By Default Pega will create Access Roles. If Required we can create a new role
or we can modify existing role based on our requirement.
Whats Inside Access Role?
Below is the Access Role rule. Highlighted
box Contain text label Clone From, it described from which Access role
this access role is saved as from or from which access role this access
role is overridden.
How Access Role Works?
By using access role we can define which
class Operator has access to and what are all the functionality with
that class rule he has access to(Read Instance, Write instance, delete
instance, etc.)
Demo:
Now we are going to make HRApps:HR role has
no access to EmployeeEvaluation class.
Checked out HRApps:HR role’s rule.
Before
did any modification HRApps:HR role has full access to EmployeeEvaluation class.
If we click class name a popup box will open
that displays Access Role of Object rule for the corresponding class
there we can update access controls.
Updated all access controls to 1.
We can provide values from 0 to 5.
In Every Pega environment like Development,
QA, UAT and Production there will be a Production Level.
If we provide access Control above or equals to Production Level then
access is granted for the particular functionality. If we provide access
Control Less than Production label then access is denied for the particular
functionality.
In Our Dev Production Value is set to 4.By
using the DSS(Dynamic System Settings) we can update that value. So If we
provide access Control value 4 or 5 then we have access to that functionality.
If we provide Access Control as 5 then role has
access till Production environment.
Now Updated all access controls to 1. So
HRApps:HR Can’t able to Read instance, delete instance, Write instance, read
rule, write rule, delete rule.
Logged in with HRApps:HR Credentials.
From the list of case try to Open Employee
Evaluation Case.
A window shows that HRApps:HR has no access
to that Case.
Updated Access Controls to 4 and checked in
the changes.
Can able to open Employee Evaluation case
from HRApps:HR Access roles.
Now we will see what is Access Deny rule
and Privilege rule
Access Deny Rule:
Access deny rule is just opposite to
Access Role of Object rule. Means We are using Access role of Object rule
to grant access to classes based on Production Level . Here in Access deny rule
we are denying access based on Production Level.
If We provide Access Control as 5 in Access
Deny rule - Access is denied till Production environment.
If We provide Access Control as 0 or 1 in Access
Deny rule - Access is Granted till Production environment.
Access Deny and Access Role of Object rule name must be same as Access
Group Name.
Demo:
Create a new Access Deny rule for Candidate
class.
Access Deny rule updated in Access Role.
Provided Access controls for
Open,Modify,Delete instance as 5. So HRApps:HR Can’t open Candiate Instance.
Lets test it by login into HR Portal.
Logged in into HRApps:HR’s Portal
From the list of case, click Candidate
Case.
Access Denied. Since we set 5 as Access
Control in Access Deny rule.
Lets change Access Control as 0 or Blank
and test again.
Changes updated in Access Role.
Lets Open Candidate Case in HRApps:HR’s
Portal.
Now can able to Open Candidate Case.
Privilege Rule:
Privilege is a granular part of Access
Role of Object and Access Deny Rule.
Access Role of Object and Access Deny rule
Used to control access to class. But Privilege Used to control access for
Particular rule(I.e Flow, Flow Action, Property, etc.)
So If this privilege is added in any rule
then that rule is accessible only if the privilege is added in the access role
Demo:
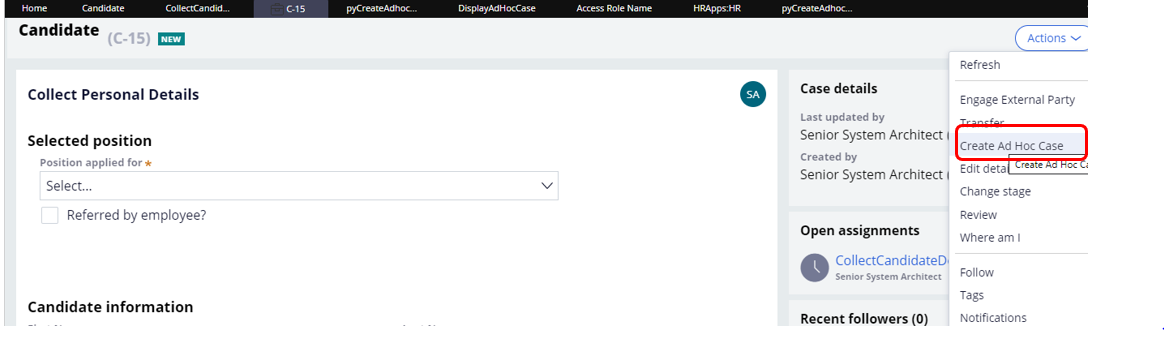
Adding Privilege in Flow Action:
We have flow in candidate case, In first
Assignment(CollectCandidateDetail) we are going to add a Privilege to restrict
access to available local action.
Below screenshot shows the list of local
action to display in action button.
Opened pyCreateAdhosCase local action(flow
action) and added Privilege in Security tab.
Created
a privilege DisplayAdHocCase
In Work class added DisplayAdHocCase
privilege. So this flow action will display in action button only if the DisplayAdHocCase
privilege is added in Access role.
Provide production Level as 5 , so grant
access.
Ran the case, in action button we can see
Create Ad Hoc Case local action.
Updated Level to 0 , so the local action
will not display in this access role also.
Ran the case, In Action button Create
AdHoc Case local action is not available.
Adding Privilege in Flow:
Open Flow rule’s process tab.
In Security add a privilege name and its
corresponding Privilege class.
HasCandidateAccess privilege created.
Candidate class in Access role before
adding privilege.
Added
HasCandidateAccess Privilage in TGB-HRApps-Work-Candidate class under
HRApps:HR Role with production level 5.
When try to run the flow from Administrator
portal system through authorization error. We added Privilege in this flow. So
Access role which having this privilege can only access this flow. For other roles
System will show Authorization error.
Updated production level to 0. So This role
also has no access to the rule which having HasCandidateAccess flow.
Case
opened but flow can’t able to open .
There are two types of Access Control:
l Attribute based access control
l Role based access control - If we want to build security based on
role we can use this method(Restricting access based on roles, privilege).
Attribute based access control(ABAC):
Use
attribute-based access control (ABAC) to restrict access to specific
instances of classes(case, report, property), and to enforce instance-level
and row-level security.
Access restrictions are enforced by
defining access control policies. Conditions used in access control policies
compare attributes in class instances to other information (typically,
information about user’s identity, organizational reporting relationships, or
other security credentials that might be case-specific).
Access is permitted only when all
relevant policy conditions are satisfied.
Encryption policies under ABAC do not have
associated conditions. These encryption policies are used to unconditionally
encrypt sensitive property values, and can be used together with other access control
policies to conditionally obfuscate or mask these values within application
user interfaces.
Attribute-based access control policies do
not restrict the processing of client-based access control requests.
ABAC Rules:
- Access Control Policies(Rule-Access-Policy)
- Access Control Policy Condition(Rule-Access-PolicyCondition)
How to use Attribute based access
control?
Created a sample flow with 3 assignments.
In First assignment we are getting employee details. In second assignment we
are displaying provided values to manager for review and he can reject the
employee case or he can approve the employee case. In 3rd assignment
we are displaying values to a user for review . He can approve or reject the
case.
So In First Assignment we are getting
Account Number and IFSC Code from employee . Since those details are confidential
we should not allow all the user to view those data. Only Manager can view
those data. For other user we should not display those data or else we can mask
the Account Number and IFSC Code while displaying any screen.
Configuring Attribute based access
control:
In Record Explorer -> Security
Category create a new instance under Access Control Policy Rule type.
From the list of Action select PropertyRead.
Why we are selecting PropertyRead?
We
are going to restrict access to particular property read by user. So we are
selecting this option. We can use any action based on our requirement.
To understand about Access Control Policy Click here
Added the property to mask AccountNumber
and IFSCCode. If we click the configuration icon near restriction method a
pop-up box will display there we can add with which digit we can mask values
and how many digit we have to mask.
Account Number we are masking with * and 10
digits we are masking.
In Access Control Policy rule, we have to
add access control policy condition rule near permit access if .
If access control policy condition becomes
true then user has access to view property. Or else we will mask the property.
Below screenshot shows access control
policy condition rule. Here we can add logic to check.
In Condition logic I added a Access when
rule(IsNotManager) If this rule becomes true then we are returning false as
output to Access Control policy rule based on our condition. If the rule become
false then we are returning true as output to Access Control policy rule based
on our condition .
Access when rule. Here if OperatorID Unit
is accounting then it will return false. Or else it will return true based on
our condition.
So If We login with accounting credentials
, we will mask the Account Number and IFSC or else we will grant access to view
those fields.
Lets Run the case and check the rules.
First assignment screen(Admin Portal)
Case routed to next operator(Manager)
Second assignment screen(Manager Portal)
Logged in to manager portal. Case is in
case manager workbasket.
Approved the case in Manager Portal
Routed to next operator(Accounting)
Third assignment screen(User Portal-
Accounting work queue mapped)
Logged into Case worker portal.
Here we can see Account Number and IFSC
Code is masked. Accounting user has no access.
Access Manager:
To simplify the configuration of security
records, Pega provides the Access Manager. The Access Manager presents you with
an easy-to-use interface for managing application security. In Dev Studio,
navigate to the Configure menu and select Org & Security > Access
Manager to open the Access Manager.
The Access Manager provides three tabs
for configuring security settings in an application.
1.
Use the Work & Process
tab to configure access control for instances of a specific case type.
2.
Use the Tools tab to
configure access to Pega tools such as the Clipboard and Live UI for end users.
3.
Use the Privileges tab
to manage access to specific records, such as flow actions and correspondence
records.
Work & Process Tab:
We can use this tab to update access to
case for particular access group.
We can select the application to which we
want to update case access.
Below is the list of Case type available in
current application.
Select the access group from the list to
update access to case type.
If we update the access controls from
access manager it will update the changes in Access role rule.
HRApps:HR’s role candidate class before
updating in Access Manager.
Updated access conrol from Access Manager
wizard.
HRApps:HR’s role candidate class before
updating in Access Manager.
We can update like Full Access, No
Access, Conditional - we can provide some when condition to check- If that
when becomes true then access granted or access denied.
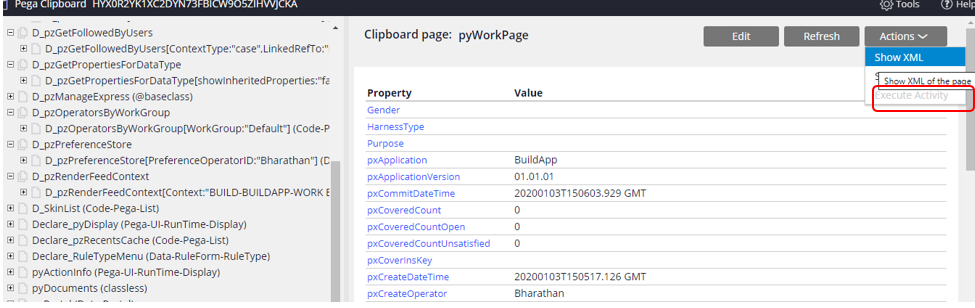
Tool Tab:
In tool tab we can update access to pega
tools like clipboard, tracer, reports, rules and ruleset, etc.
How its work?
Selected access group as
HRApps:Administrator
Selected No Access for executing
activity on clipboard page.
After update we can see execute Activity is
disabled in clipboard.
Make No access to tracer
In Tracer we can see all the functionality
are disabled now.
Privilege Tab:
In steed of adding privilege in Access role
we can add directly in Access Manager.
If we provide Role Name and class name
system will show list of privilage for that class under the provided access
role.
We can add privilege to access role under
class from here using the Add button.
In Access role rule we can see the
privilege is added(ActionSave)
Reference: