Tuesday, 28 August 2018

How to create Local Data Table or Local Database in pega

How to create Local Data Table or Local Database in pega


Hi Friends, Today We will see how to create Local Data base or Local Data table in pega. 


Normally all the case information will store in PegaData database., For example, We are running a flow. We are giving some information in the section. Then where all the information will store??

We are not created database , tables, then where it will store? these details will store in PegaData database. the default database provide by pega. We can store up to 1000 records in PegaData  for each Class == Data Table .In pega we are creating the class then automatically table will be assigned for that class. These We will try now.


Now I am going to create one data class.


First click the app explorer,


Generally it shows Work Class structure,  Normally we will create Local Data base in Data Class only so switch to Data Class Structure by replace Work With Data and then enter.. We can create Data Table by using Data Type option also ..I will say later.

Now we can create our Data class by clicking sysadmin->Create -> Class

After clicking the class, this New Rule Window will open here we have to give the class name in the Lable Field and give the same in the Class Name field after "TGB-HRApps-Data-"  


Then click Create and Open.

Select Class type as Abstract, Choose the version, and choose the class hierarchy. Then click Save.


After I clicked one error message in class creation came, 

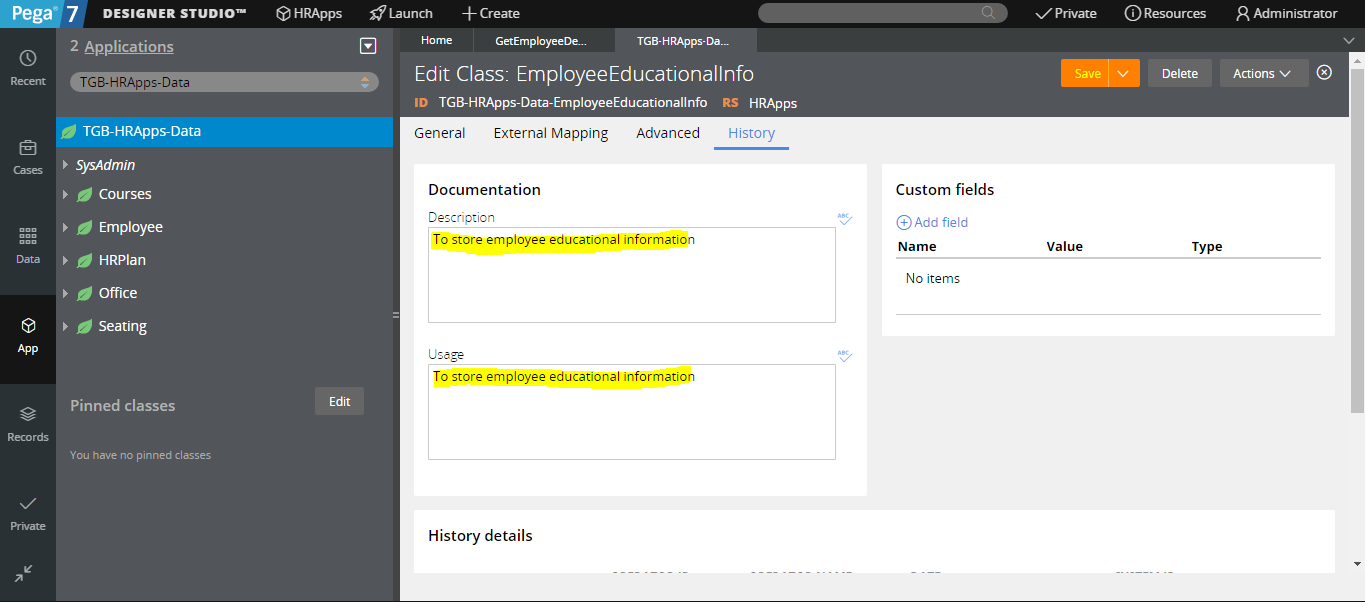
In history tab, we must provide the Description and usage or else this error will come. then try to save.

Yeah it saved!!

Then refresh the app explorer and see whether our class is added or not.

After creation of class, we can create properties in our class. since class is act as table in pega, properites are act as column in table. so lets start create properties in our class by righ click on our class and Select Create Properties option.
Now data type rule will open, here we can add our properies by clicking add field
After Create properties click add to data explorer, then open Source tab
Here click the Create local Source button, then one pop up box will open there we have to choose one column as key and we can give value alos if we want for 1st record.
On clicking the next button, a review screen will open click close.

Now open the Record tab there we can see our table structure.
We can add records here.
Thats all, we created local data table. If u have any doubt ask in comment 😊

How to Skip New Harness on Running Flow

How to Skip New Harness on Running Flow


Most of the time when I run a flow or Run a Case Type in case designer  I frequently see the "New Harness" before my case open. 


We no need this harness now, so lets try how to skip this new harness .

For this we have to open the Process tab of the flow rule.

In this we to check the Skip Create harness and Change the Work Parties Default to "pyCaseManagementDefault"
After Modification
Now save the rule and Run the flow again. Now you can see my case is directly opened without open new harness.

If any doubt ask in comment ☺

Monday, 6 August 2018

Pega Programming to calculate Sum the odd and even numbers, respectively, from 1 to a given upperbound.

Sum the odd and even numbers, respectively, from 1 to a given upperbound


Hi Friends, I try to implement one simple program "Sum the odd and even numbers, respectively, from 1 to a given upperbound. "


Lets see how to implement this in Pega.

I created one flow 

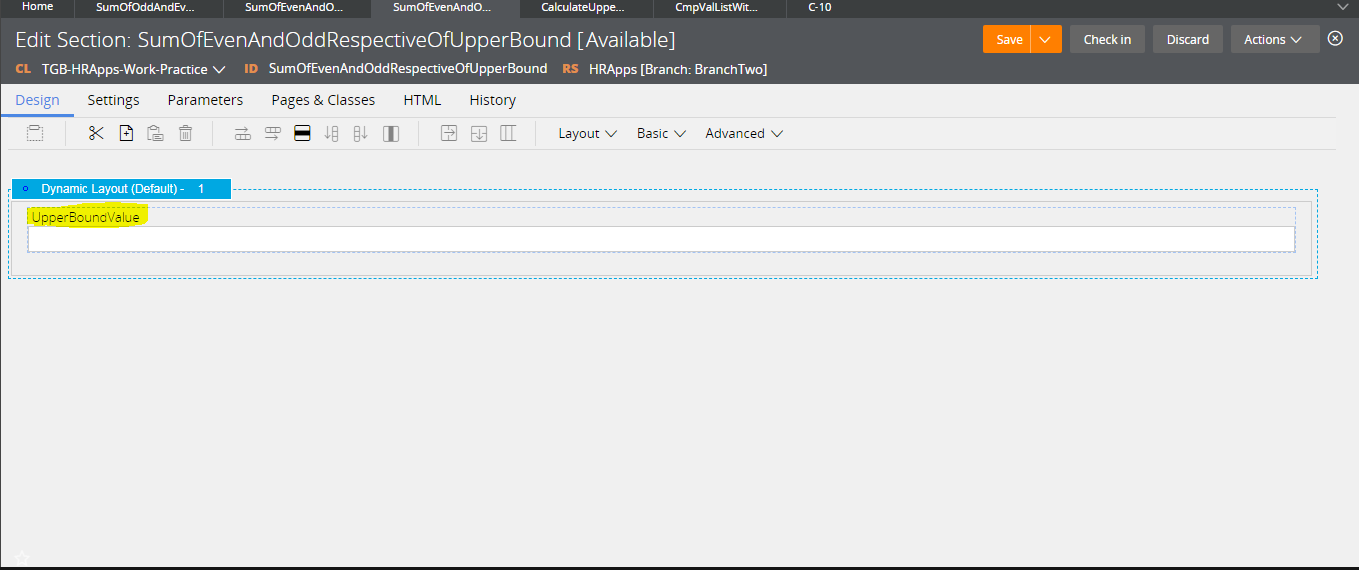
In the Section I get the UpperBound Value using one text box. 

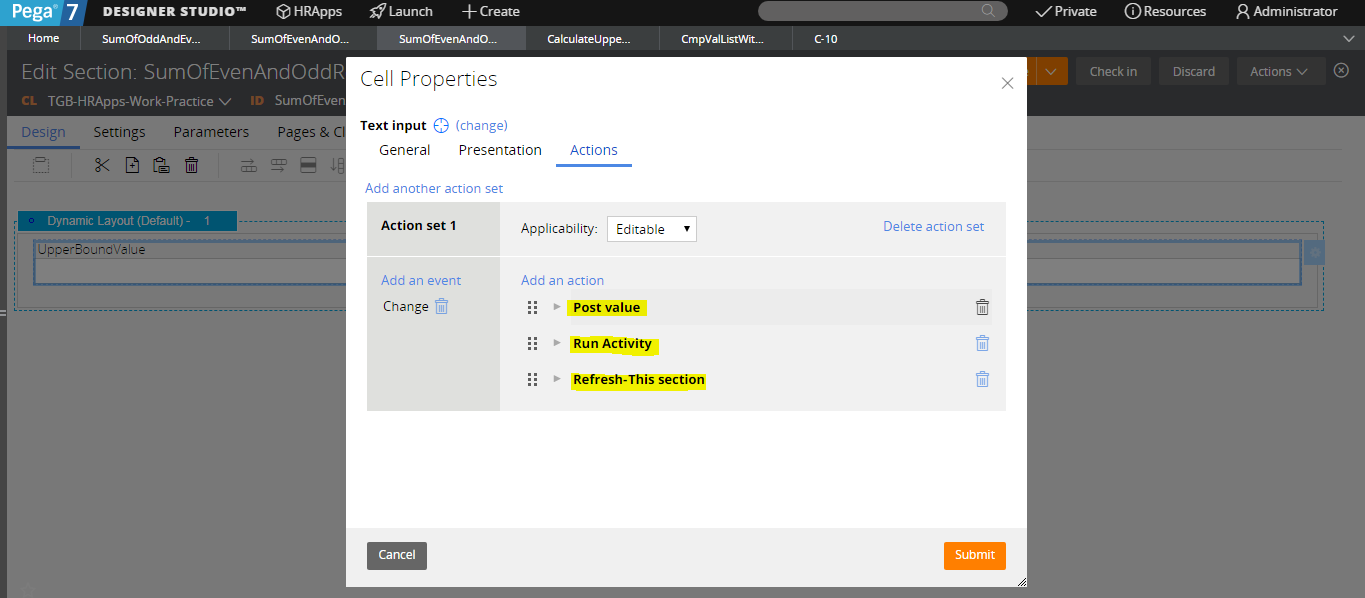
In the action tab of property control I added three action on Value change in text box.


Post Value - to post this value to clipboard.
Run Activity- to run the activity to acheive our functionalities
Refresh-This Section -  to display the output in below 2 text boxes(Not yet created , I will create later). On refresh only we can access the clipboard page property. So we refresh this section.

In Run Activity I called one activity named CalculateUpperBoundValue.


Lets see how to acheive this logic using activity.


This is the activity I created.


In first step I used Page-New , this step is to hold all the values while we process the data. I gave page name as PageOne , after we give here the Step Page name we should give page and class name in Pages and class tab.


Next Page-Copy, In this step I copied all the values from pyWorkPage to PageOne

U can ask , I am not gave pyWorkPage in any place, The answer is if  we are not give any page name in CopyFrom then in compile time it takes the page of previous step.

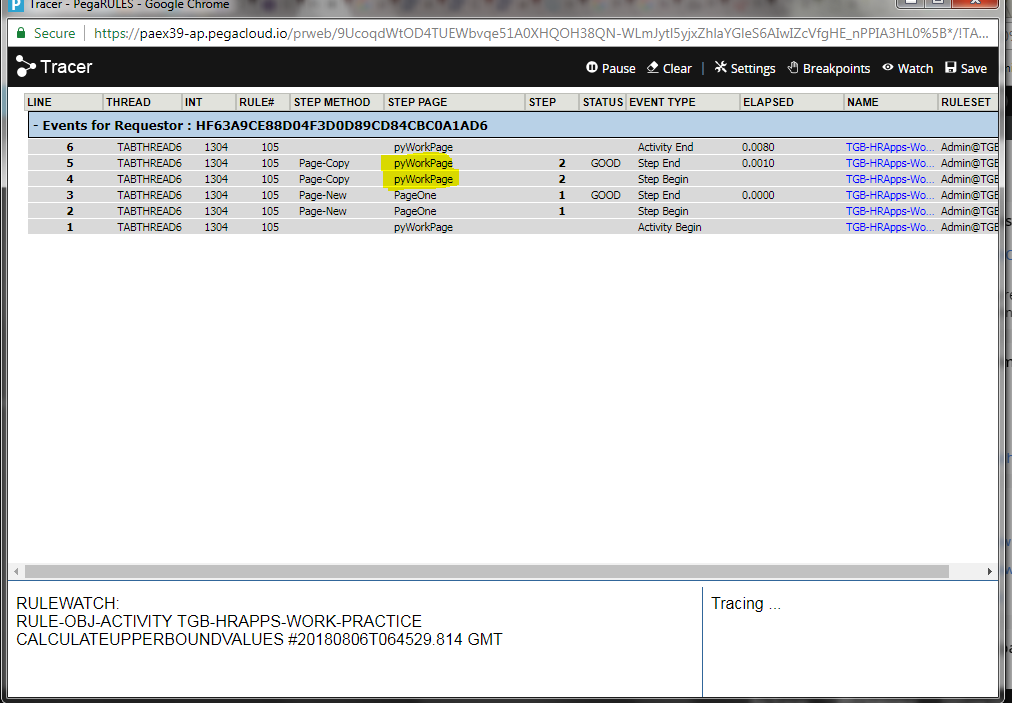
We can test this with tracer. I comment all the steps below 2 and see what happend.
You can see In second step the step page is pyWorkPage so automatically in PageFrom it takes pyWorkPage.

We are copying all the value in pyWorkPage to PageOne.

In Step 3 , I added Property-Set to declare properties with default value.

Here U can see I used Local Variable, if we used Local Variable we can use this value in all this places in this activity not outside this activity.

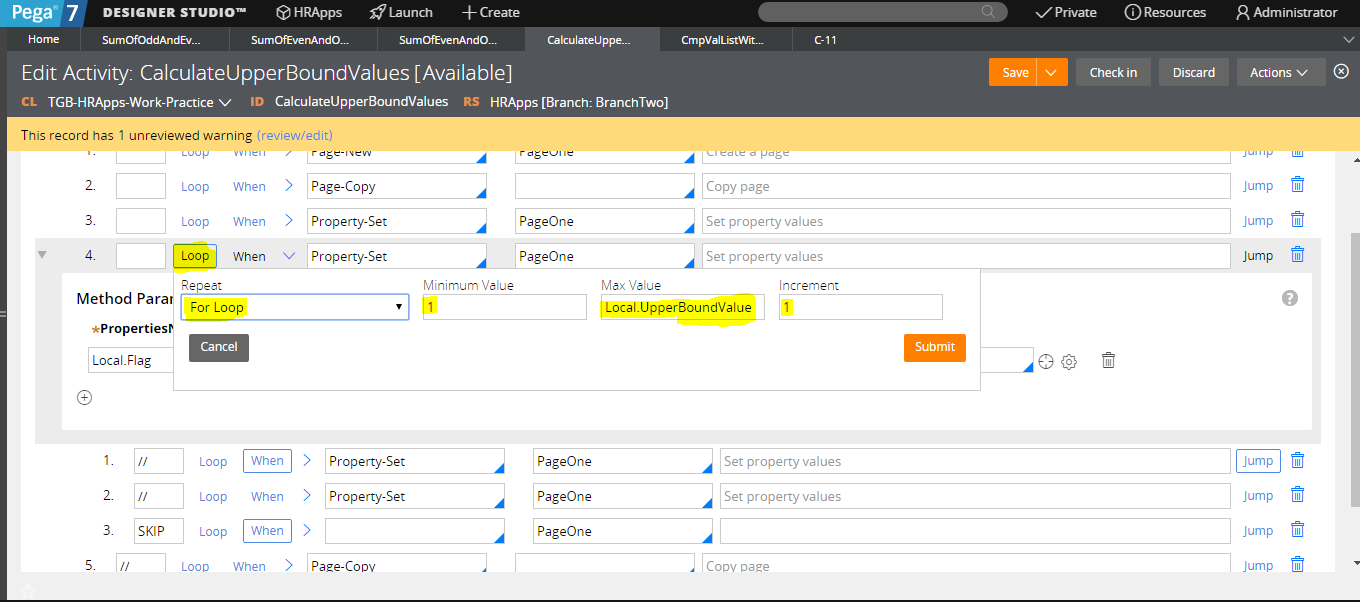
In the fourth step, I used Loop to achieve the while loop in above program.

I added a child for 4 th step to add all the even numbers and odd numbers. In 4.1 I added a when condition to check whether the current value is odd or even number.


(<CURRENT>) - it is similar to i in for loop
On first iteration, (<Current>) value will be 1 in sencond iteration (<Current>) value will be 2 and in 3rd iteration (<Current>) value will be 3 ans so on.

If the current value is Even means we no need to execute 4.2(Used for odd value calculation). So In the end of 4.1 , I wrote condition to jump to Step named SKIP  by using Always(Built in) when condition.

In 4.2 I added a property set to calculate odd value sum.


In 4.3 we add a step , in that step I added a precondition , there we use Always to  exit the Iteration.


In the last step I added one Page-Copy to copy all the manipulated data in PageOne to pyWorkPage.

To see the result,  We refer the SumEven property and SumOdd property from clipboard to Section.

I drag and drop one dynamic layout.
then refer that two property in this dynamic layout.

I refered those two property and make them read only.

Now our UI look like this,

We no need to see the SumEven and SumOdd if there is no value in UpperBoundValue, so we can add Visibility for that dynamic layout.

Now once again , run the flow or refresh .

 Afer I gave 10, result will be.


SumEven = 2+4+6+8+10 =30
SumOdd = 1+3+5+7+9 =25

If u have any doubt ask in comment :)

Wednesday, 1 August 2018

How to Refer a Section in a Different class in an Section

How to Refer a Section in a Different class in an Section

We all knows that, we can refer an section in an section using Embedded Section option in section. If I try to refer section in different class means it will shows errror. We will see how to solve this.

Now assume I am in Section "MainArea" this section is in class"Data-Portal", Now I am going to refer an section "pyCaseActionArea" that is in "Work-"


I  try to refer this section which is in Work-


Lets see what will happen.


It says that Please enter a Valid section, this is happend because class mismatch between two class. Both Section is in different class so this error may come.

How to solve this??

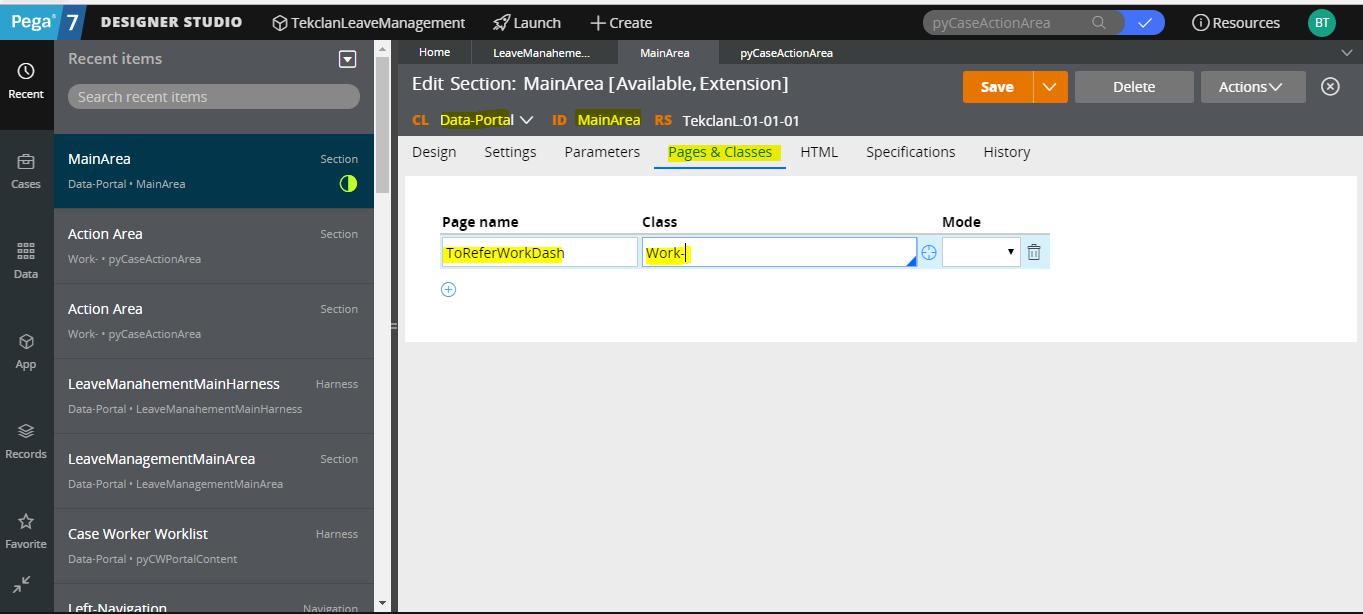
We have to create one page in Pages and Class tab like  in the MainArea Section

Page:  ToReferWorkDash
Class: Work-


then while referring section we have to choose Use Clipboard Page, then it will ask for Clipboard Page  we have to give this page "ToReferWorkDash" and change the Class Name to Work-


Now I can able to refer that section . thats all. if any doubt ask in comment.