Wednesday, 20 March 2019

How to Copy Messages in One Page to Another One Page in Pega

How to Copy Messages in One Page to Another One Page in Pega 

Hi all , During my work I faced one issue and the issue is when I am validating any property that is in Temporary Page , the message is correctly set in temporary page but that message is not displaying in the User Interface. I browsed the PDN , there I got one information and the information is Pega configured to display the messages that we are setting only in pyWorkPage not temporary clipboard page. In this post I will share how to copy the message from Temporary Clipboard page to pyWorkPage.

I created a Flow to get Employee Details in TGB-HRApps-Work Class and the Properties I created in TGB-HRApps-Data-Employee Class , Now If I want to use the properties that I created in Data class to Work Class I need to create one page in Work Class and I have to refer the data class properties using this page.


Reffered the data class property using Page "EmpPage" .


Pages and Class tab of section :


I added validation rule in flow action.

Now our Expectation is on run the flow if I leave the fields blank and then I click submit means it should through Validation Error. Let's check that. 

I created a new case and left all the fields blank , lets click submit button and test whether it shows error message or not. 


I clicked submit button and it not displayed any error message and completed the case.


If I checked the clipboard I can able to see page messages in "EmpPage" 


Validation message in clipboard but not displayed to user 

Pega will display message that is available only in pyWorkPage.

 So we have to transfer this message from EmpPage to pyWorkPage. So In Flowaction Post-Processing I added one activity.

 I added activity "PostEmployeeDetails" in Post-Processing 


I added a step to transfer message from Temporary Page to pyWorkPage.


In the step 1 , I added a when condition to check whether EmpPage contains messages using @hasMessages(EmpPage) method , if has message then get the message in EmpPage using @getMessagesAll(EmpPage) using step page as pyWorkPage. In the above activity I not provided the step page name. dynamically pyWorkPage will come as step page. 

Lets check again whether messages are copied to pyWorkPage or not by running the flow.

I am tracing this activity to check the background process.


In user Interface, now I can able to see the Validation Messages.


In tracer we can see the messages are available in pyWorkPage. 

Thats it. Hope you understand. 

Saturday, 9 March 2019

Important Java codes used in pega -Part 1

Important Java codes used in pega -Part 1


Hi Friends, Today we will learn below java functions in pega .


  1. How to get Parameter value in java code.
  2. How to put Parameter value in java code.
  3. How to get Clipboard Page in Java code.
  4. How to get property value from Clipboard Page in Java code

How to get Parameter value in java code?        

    Syntax: tools.getParamValue("ParameterName");

This function will return String value of the parameter name that we provide in the double quotes.

Let's Check this, I created one flow to get data like firstname and lastname. In the first assignment flow action I added one post processing activity In that activity I set one parameter. In the second step I added one java code to get the parameter value that I set in first step.

In the first step, I added one property set to set param value.

In the second step I added one  java step to get parameter value.
In the above java step I get the Parameter value of GetDataFinished and set that parameter value in another parameter named ValueinISGetDataFinished. Now lets run the flow and put trace open rule this activity to check function.

Now I processed the flow and my activity is get traced. Lets check

Here you can see the the value is get copied to new parameter. So this function is now working.

How to Put Parameter value in Java code? 

       Syntax :tools.putParamValue("ParameterNameToWhichToPutValue","Value");


How to Access Clipboard Page in Java Step?

    Syntax: ClipboardPage Page = tools.findPage("AnyClipboardPage");


what this function will do? . This function will return the clipboard page that we provide in the double quotes. With this page we can access all the property inside this page.

Let's use this function in our java step.
In the above code I am getting the pyWorkPage in WorkPage  and get the FirstName and Set the FirstName to "ParameterFirstName" parameter

Lets run the flow and check whether ParameterFirstName contains the name that we provide for FirstName in section.

I processed the flow and my activity is getting traced.

Let's check the parameter page.
In the above screenshot you can see ParameterFirstName is updated with name Rahul that I provided in section. So this function working in our java step.

How to get property value from clipboard page in Java?

       Syntax: ClipboardPage.getString("propertynamewithoutdot");


you can see this code I used in above example.


Sunday, 25 November 2018

How to Use Navigation in PEGA


How to Use Navigation in PEGA

Lets assume we have a portal in which there is a Navigation on the Left side and header on the top and Main Working area is in Right Side like this


Now On Clicking Home, Corresponding Home content should visible in Main Content area,
On Clicking About Us, Corresponding About Us Content should visible in Main Content area,
On Clicking Services, Corresponding Services Content should visible in Main Content area

How to achieve this in Pega?

There is a rule called Navigation rule , by using this we can achieve this concept. Lets see how to use this practically.
Every portal has a portal rule, Manager portal has a portal rule, Case Worker portal has a portal rule.
Lets Create One Portal Named "Lets Shop".

In the access group we can see the available portals in the application. Click Add Portal and add our portal by creating New one.


I created a portal, Here we have to map a Harness that will visible when we launch the portal.


I created a New Harness Name "LetsShopMainHarn" and mapped to our portal rule and save.


I mapped our portal in list of portals in Access Group Rule. Now we can launch our portal, Lets see how it looks .


Now I launched the portal, there is nothing in this portal, because we not configured anything in the harness.

So lets design our portal.


Choose Header Left screen layout.


Now lets Create One section for Header Area.


I added my Header Section contain one label.

Lets Create Navigation Section and add Navigation rule in that section.


I drag and drop the menu control from Advance Category and added a navigation rule.

Now we have to add Menus to our Navigation rule.


I added the first menu of our portal named 'Home', We have to add action for this menu, then only corresponding harness will load on the right content area of the portal.


I select Harness from action and select Target as "Replace Current".We have to provide here the Harness which we are going to create for Home Page.

Lets Create and Map HomePage harness.


I created one Harness with some content for Home page and added to the Home Page Menu.


Next to the Harness I added another one action "Run Script". We have to add this function for indexing purpose. Here I mapped Home page index as 0, Then it automatically take about as index as 1, our service index as 2 respectively.


Similarly I added menu for about us , and added Harness for About us and after the Harness we have to add one Script "RemoveScreenLayoutMask". If we not used this function then a empty screen will display if we cut the harness, So added this script.


Similarly I added menu for Our Services and added harness for this menu.


Now we finished Navigation rule part. Lets Design content part of our Harness. 


Lets Drag and Drop One section, I provide Name for this section like "LetsShopMainArea"

In this section, Our First Layout should be "Dynamic Container", Why we should use Dynamic Container??.

If we are not use dynamic container, Then on clicking menu your harness will not load on Main Content area.
If you use Dynamic Container, then the harness in your menu will replace the harness that we provide in the Dynamic Container.


Lets implement Dynamic Container in our Section.


We have to load the harness dynamically in this section so we have to choose Harness as Default View in this option and we have to provide a Default harness which is visible on portal launch. I add HomePage harness in this option.


Delete the Dynamic layout which is there as default.


Lets Launch the portal and see the result.


This is the screen which is visible on launching portal, Now Click About Us and check AboutUsHarness is loading or not.


On Clicking About Us "AboutUs" Harness is loading.

Lets click Our Service and test that menu also.


Now all the menus working properly. If u have any doubt ask in comment :)

How to Insert Records into Table in Pega

How to Insert Records into Table in Pega


I was created an Local Data Type with Zero Records, Lets see how to insert data in to Table.

I have created a flow , in the first assignment I get Employee Information .In  the flow action post action I mapped an activity to enter the information what we get in the first assignment into the table.


Now add activity to flow action post action.

Activity Methods used to insert data to table.

Pages and Class Tab:

In this activity we are inserting the data in to the table, We have all the data except EmployeeID, We have to get incremented  EmployeeID for each employee.

EmpCaseInfo page to store Case Details what user provide in the form.
MaxRecords page to store existing records in table.

Obj-Browse to retrieve all the data which is already present in the table. We are using this step to get the count of the table, Now we can add 1 to get next employee id for current Case.
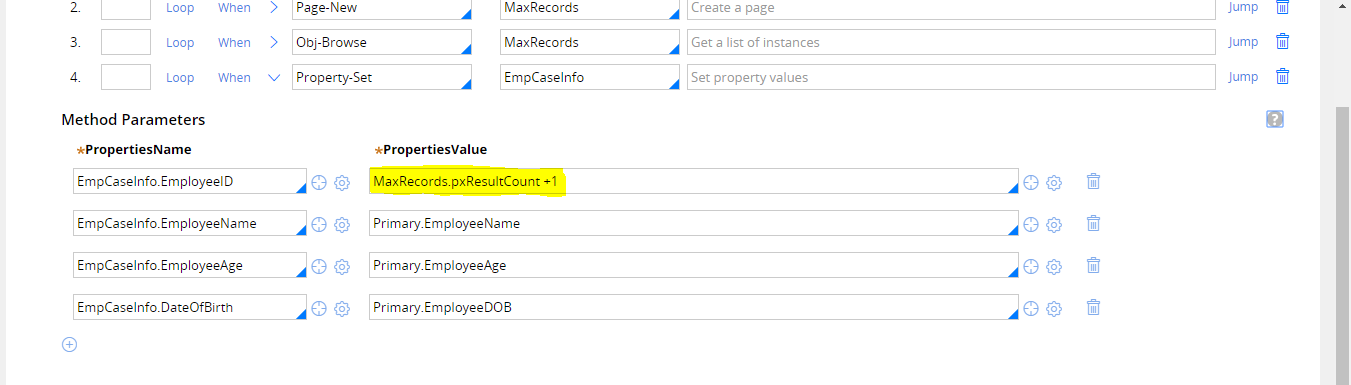
In the property-set , I copied the data in Primary Page(pyWorkPage-TGB-HRApps-Work) to EmpCaseInfo(TGB-HRApps-Data-EmployeeInfo) Page.


EmployeeID is calculated by record count of the table +1, if 10 records are already present then pxResultCount will be 10, for our next record we are providing EmployeeID 11.


Obj-Save to save the data into Table.

Lets test the activity by run the flow and enter test data.

I am providing this data and click submit.

Now you can see first record is inserted.

Lets provide another one data.
After processed this case, you can see a new record is added in table.

That's all insertion of data into table. If you have any doubt ask in comment.